Azure IOT Hub REST API

Not many people would be familiar with the existence of an REST based Azure IOT API. So if you are working with a client or device which does not have an API for Azure IOT, you can still use Azure IOT due to the REST API exposed both for sending messages to Azure IOT Hub and also receiving them.

In detail documentation is provided at :Azure IOT REST API

We will be looking at a simple example of how to send messages and receive them using this API.

Prerequisites :

1. Azure Account (Obviously !!)
2. Either have a controller/MCU (eg. Raspberry PI) could be Low powered but should have internet access and sending data to the Azure IOT Hub an example is shown Creating C# application’s on Raspberry Pi
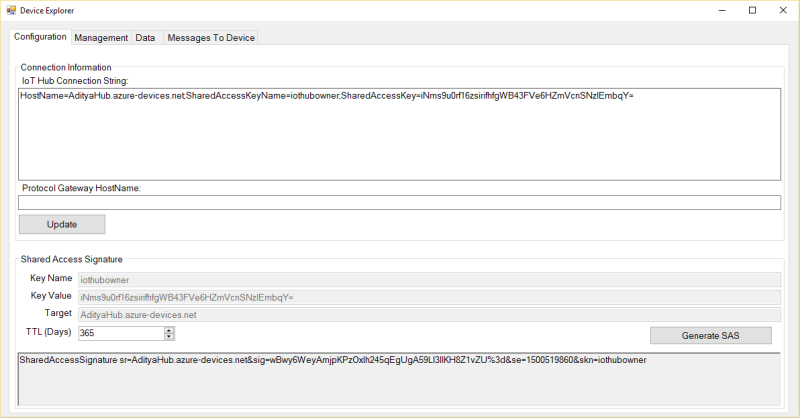
3. If you do not have the “things” in step 2, you can always download the “azure-iot-sdks” from GITHUB – Azure IOT SDK . This has a Device Explorer inside “Tools” and you can open this in Visual Studio and “Run”. You will be able to see the screen as below
1

4. Write your own client in any languague (iOS App using Swift / Objective C/ Android App) or Download “POSTMAN” which is a good REST request testing App , you can find POSTMAN

Now lets look at how the Request and Response format for REST based calls are

SEND DEVICE TO CLOUD MESSAGES :

Method Request URI
POST https://{IoTHubName}.azure-devices.net/devices/{deviceId}/messages/events?api-version={api-version}

.

Common Headers

The following information is common to all tasks that you might perform related to IoT Hub:

  • Replace {api-version} with “2016-02-03” in the URI.
  • Replace {IoTHubName} with the name of your IoT hub.
  • Set the Authorization header to a SAS token created as specified in the device section of Using IoT Hub security tokens.

Now the most important step . Before working with any request you would need to generate a SAS (Shared Access Signature) token. 

There are couple of easy ways to generate a token,

  • Using c# code : Inside “Microsoft.Azure.Devices.Common.Security” you will have “SharedAccessSignatureBuilder” which we will make use of. So you would need to add “Microsoft.Azure.Devices” Nuget packageCode would be as below,
 try
            {
                var builder = new SharedAccessSignatureBuilder()
                {
                    KeyName = keyNameTextBox.Text,
                    Key = keyValueTextBox.Text,
                    Target = targetTextBox.Text,
                    TimeToLive = TimeSpan.FromDays(Convert.ToDouble(numericUpDownTTL.Value))
                }.ToSignature();

                sasRichTextBox.Text = builder + "\r\n";
            }
            catch (Exception ex)
            {
                using (new CenterDialog(this))
                {
                    MessageBox.Show($"Unable to generate SAS. Verify connection strings.\n{ex.Message}", "Error", MessageBoxButtons.OK, MessageBoxIcon.Error);
                }
            }

This would generate a SAS token.

    • Using Device Explorer :Copy the IOT Hub Connection string from the Azure Portal. Open Device explorer as explained in Ste 3 of prerequisites, and in the “Configuration” tab input the Connection string and press update as below,1

A SAS Token would be generated

Using either of the procedure you will have a SAS token.

Now we will use POSTMAN (lazy to create a Client) to send a POST request to our Azure IOT Hub.  For those who are familiar with POSTMAN or any other REST API test client you need to create a header as shown below.

2

I have added a “Request Header” called “Authorization” and added generated SAS Token as its value.  The Content type i have kept as “application/xml” .

The URL i have build using the standard given above which turns out as below

https://AdityaHub.azure-devices.net/devices/myRasp/messages/events?api-version=2016-02-03

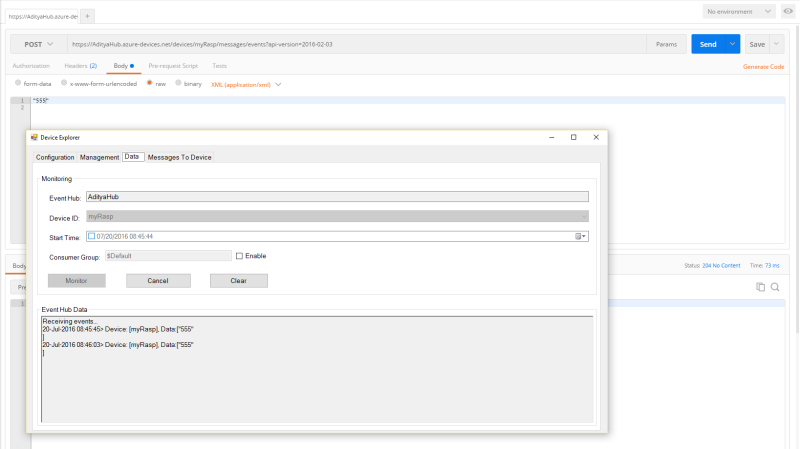
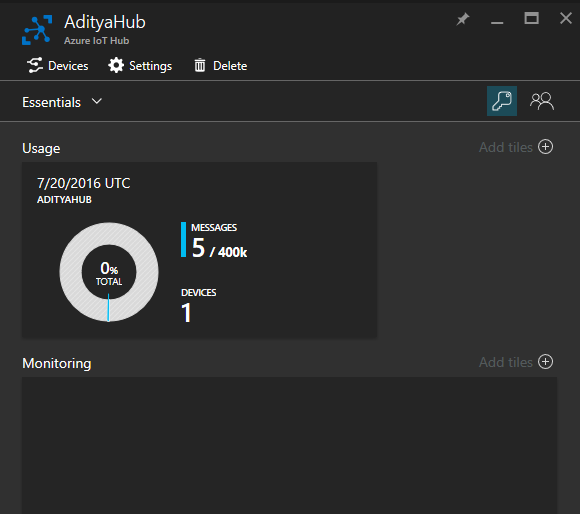
You can send in a request using this and we will be able to see the messages either in the Azure Portal / Device Explorer (In “Data” tab click Monitor) as shown below,
3

4

As you would be able to see, i have sent a message called “555” and it is being shown in both Device explorer and Azure Portal.

RECEIVE A CLOUD TO DEVICE MESSAGE :

Method Request URI
GET https://{IoTHubName}.azure-devices.net/devices/{deviceId}/messages/devicebound?api-version={api-version}

In URL is slightly changed from using Events in the POST to using Device Bound in GET Request.

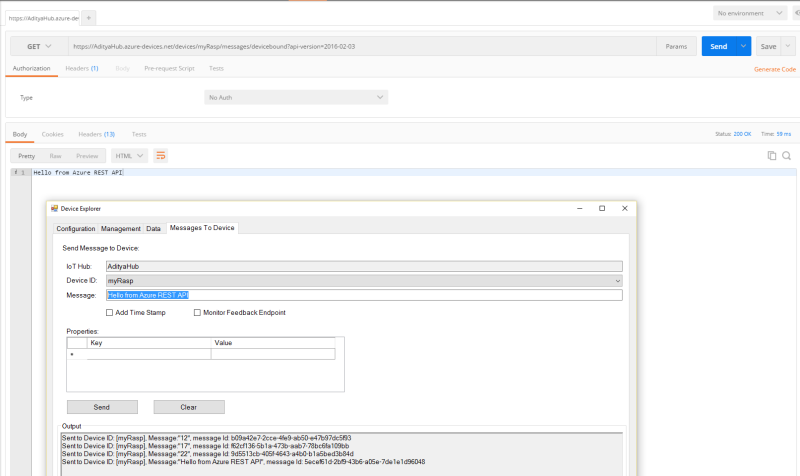
In this also we will need to use a SAS token as shown above. We will change the URL as below for our GET Request.

https://AdityaHub.azure-devices.net/devices/myRasp/messages/devicebound?api-version=2016-02-03

We will use POSTMAN  to get a response and Device Explorer to send a message as shown below,
5

The message sent is now visible as a Response.

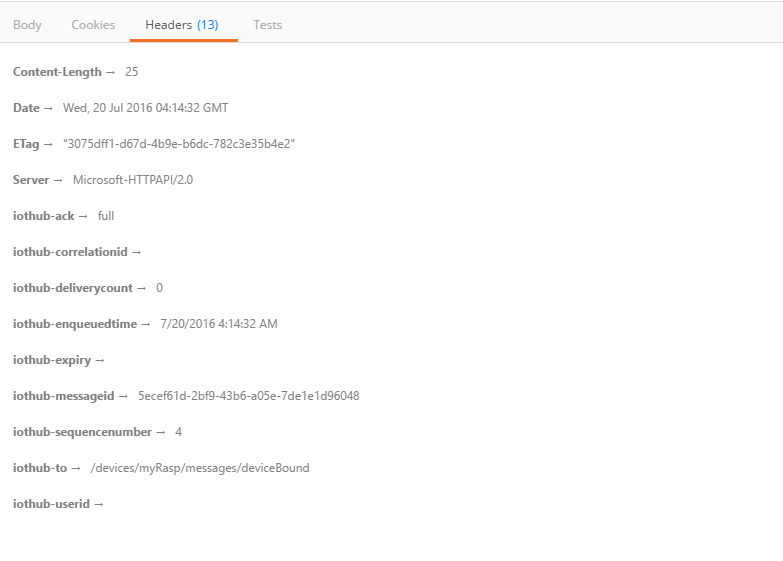
You would also be able to see below messages in the Header,
6

Thus with this Azure IOT REST API, you would not need to worry on the API availability for your client. Even from your device perspective, if it has a REST Service call capability, you can use that and send a request. You will also be able to Complete , Reject or Abandon a message using the REST services. You can visit the In detail API reference as shared above.

Azure WCF Rest Service – CORS Issue

What is CORS ? 

A resource makes a cross-origin HTTP request when it requests a resource from a different domain than the one which the first resource itself serves. For example, an HTML page served from http://domain-a.com makes an <img> src request for http://domain-b.com/image.jpg. Many pages on the web today load resources like CSS stylesheets, images and scripts from separate domains.

For security reasons, browsers restrict cross-origin HTTP requests initiated from within scripts.  For example, XMLHttpRequest follows the same-origin policy. So, a web application using XMLHttpRequestcould only make HTTP requests to its own domain. To improve web applications, developers asked browser vendors to allow XMLHttpRequest to make cross-domain requests.

The W3C Web Applications Working Group recommends the new Cross-Origin Resource Sharing(CORS) mechanism. CORS gives web servers cross-domain access controls, which enable secure cross-domain data transfers. Modern browsers use CORS in an API container – such as XMLHttpRequest – to mitigate risks of cross-origin HTTP requests.

How does it work ?

The Cross-Origin Resource Sharing standard works by adding new HTTP headers that allow servers to describe the set of origins that are permitted to read that information using a web browser.  Additionally,  for HTTP methods other than GET, or for POST usage with certain MIME types, the specification mandates that browsers “preflight” the request, soliciting supported methods from the server with an HTTPOPTIONS request method, and then, upon “approval” from the server, sending the actual request with the actual HTTP request method.  Servers can also notify clients whether “credentials” (including Cookies and HTTP Authentication data) should be sent with requests.

Source : Mozilla Developer – CORS

How does a Preflight error look like ?

1

If you look at the above error, you will get a error called “CORS preflight channel did not succeed”

What was i trying to solve ?

I was writing a supposed to be easy Azure Cloud service. I created a WCF Web Role in my Cloud Project and my Service Interface is as below :

[ServiceContract]
    public interface IService1
    {

        #region Getters
        [WebGet(UriTemplate = "/GetUsers",
 RequestFormat = WebMessageFormat.Json,
 ResponseFormat = WebMessageFormat.Json,
 BodyStyle = WebMessageBodyStyle.Bare)]
        string GetUsers();

        [WebGet(UriTemplate = "/GetUser/{Id}")]
        string GetUser(string Id);

        #endregion

        #region Create Methods

        [WebInvoke(Method = "POST", UriTemplate = "/AddUser",
         BodyStyle = WebMessageBodyStyle.Wrapped, RequestFormat = WebMessageFormat.Json, ResponseFormat = WebMessageFormat.Json)]
        [OperationContract]
        bool AddUser(User user);

        [WebInvoke(Method = "POST", UriTemplate = "/AddUserDetails",
         BodyStyle = WebMessageBodyStyle.Wrapped, RequestFormat = WebMessageFormat.Json, ResponseFormat = WebMessageFormat.Json)]
        [OperationContract]
        bool AddUserDetails(UserDetail userdetails);
        #endregion

        #region Update Methods

        [WebInvoke(Method = "PUT", UriTemplate = "/UpdateUser",
         BodyStyle = WebMessageBodyStyle.Wrapped, RequestFormat = WebMessageFormat.Json, ResponseFormat = WebMessageFormat.Json)]
        [OperationContract]
        bool UpdateUser(User user);

        [WebInvoke(Method = "PUT", UriTemplate = "/UpdateUserDetails",
         BodyStyle = WebMessageBodyStyle.Wrapped, RequestFormat = WebMessageFormat.Json, ResponseFormat = WebMessageFormat.Json)]
        [OperationContract]
        bool UpdateUserDetails(UserDetail userdetails);
        #endregion

        #region Delete Methods

        [OperationContract]
        [WebInvoke(Method = "DELETE",
       UriTemplate = "/DeleteUser/{Id}",
       BodyStyle = WebMessageBodyStyle.Wrapped, RequestFormat = WebMessageFormat.Json, ResponseFormat = WebMessageFormat.Json)]
        bool DeleteUser(string Id);

        [OperationContract]
        [WebInvoke(Method = "DELETE",
         UriTemplate = "/DeleteUserDetails/{Id}",
         BodyStyle = WebMessageBodyStyle.Wrapped, RequestFormat = WebMessageFormat.Json, ResponseFormat = WebMessageFormat.Json)]
        bool DeleteUserDetails(string Id);
        #endregion

        [OperationContract]
        [WebGet(UriTemplate = "/IsValidUser/{username}/{password}",
 RequestFormat = WebMessageFormat.Json,
 ResponseFormat = WebMessageFormat.Json,
 BodyStyle = WebMessageBodyStyle.Bare)]
        string IsValidUser(string username, string password);
    }

This is a service for CRUD operation on User and User Detail. Service Implementation is just calling the Database and performing the operation using LINQ to SQL.

After i complete my implementation and try to locally check in either “POSTMAN” or “Advance REST Client” (both being tools to work with REST Service) the request and response was proper. But after i deploy this in Azure, i was getting a Preflight error as shown earlier.

Solution :

We had to add “Access-Control-Allow-Origin” in the request header, and ask the WCF REST service to allow preflight request. Sometimes, depending on your browser a “POST” request may also end up being “OPTION” request.

So, we have to follow below steps to solve the problem,

1. Add a new Global.asax (Active Server Application file) in the WCF service if you do not have one.

2. Update the code in the “Application_BeginRequest” method as below,

protected void Application_BeginRequest(object sender, EventArgs e)
        {
            HttpContext.Current.Response.AddHeader("Access-Control-Allow-Origin", "*");
            if (HttpContext.Current.Request.HttpMethod == "OPTIONS")
            {
                HttpContext.Current.Response.AddHeader("Cache-Control", "no-cache");
                HttpContext.Current.Response.AddHeader("Access-Control-Allow-Methods", "POST, GET,PUT, OPTIONS, DELETE");
                HttpContext.Current.Response.AddHeader("Access-Control-Allow-Headers", "Content-Type, Accept");
                HttpContext.Current.Response.AddHeader("Access-Control-Max-Age", "1728000");
                HttpContext.Current.Response.End();
            }
        }

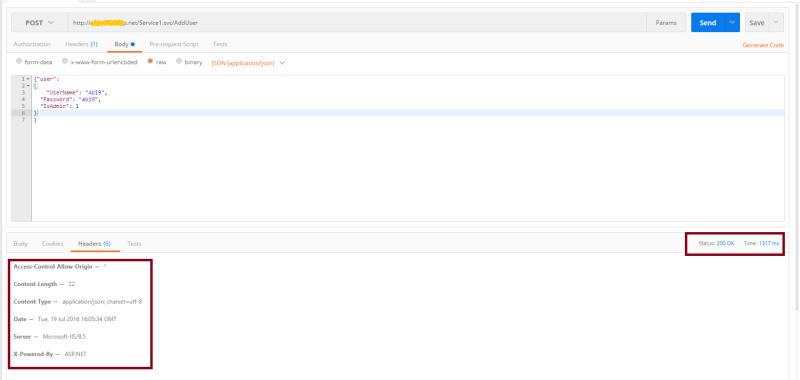
With this you will be able to see “Access-Control-Allow-Origin” in the request header.
A sample POSTMAN request is as below,

2
But sometimes the REST test Clients would send the request without any problems, but when working with Client (in this case Ionic Framework for cross platform app development) we may still get the error.

How to real time test it ?

I have written a simple “AJAX” client to test this as below,

<div>
    <select id="method">
<option value="get">POST</option>
<option value="post">GET</option>
<option value="put">PUT</option>
</select>
    <input type="button" value="Try it" onclick="sendRequest()" />
    <span id='value1'>(Result)</span></div>
@section scripts {
    <script>
        // TODO: Replace with the URL of your WebService app
        var serviceUrl = 'http://yoururl.cloudapp.net/Service1.svc/UpdateUser';
        var user =
              {
                  "user":
    {
        "Id": "28",
        "UserName": "K999",
        "Password": "k999",
        "IsAdmin": 1
    }
              }


        function sendRequest() {
            var method = $('#method').val();

            $.ajax({
                type: "PUT",
                url: serviceUrl,
                data: JSON.stringify(user),
                crossDomain: true,
                contentType: "application/json; charset=utf-8", // to the server
                ProcessData: true,
            }).done(function (data) {
                $('#value1').text(data);
            }).error(function (jqXHR, textStatus, errorThrown) {
                $('#value1').text(jqXHR.responseText || textStatus);
            });
        }
    </script>
}

Hope it helps somebody. Happy coding !!

Azure IOT with Raspberry Pi

Prerequisites : https://adityaswami89.wordpress.com/2016/03/01/creating-c-applications-on-raspberry-pi/

  1. Open your Azure management portal (https://portal.azure.com/)
  2. Click on New -> Internet of Things -> Azure IOT Hub 1
  3. Choose the appropriate name, pricing standard you could choose as free if this is your first IOT Application. Azure allows 1 free pricing to be chosen. Click Create.2
  4. The deployment will start and will take couple of minutes to finish. 3
  5. After deployment , select the created IOT Hub and make a note of the “Hostname” and “Primary connection string as shown below”4
    Creating Device ID 
  6. Once you’ve set up your instance of IoT Hub, the first thing you need is to create the identity for your device. Every device must have a key that uniquely identifies it to the service. This way the IoT Hub can securely associate the data with the device that sent it.
    To create a device ID, use a tool called ‘iothub-explorer’. The tool requires Node.js, so make sure it’s installed on your machine (or get it NodeJS).
    Now open the command line prompt and install the iothub-explorer package:

    npm install -g iothub-explorer@latest
    

    The tool will need the connection string to connect to your instance of the Azure IoT Hub. You can find the connection string in the Azure Portal under the settings tab of your IoT Hub instance: navigate to Settings | Shared access policies | Connection string – primary key.
    Now create a new device called ‘myRasp’. Run the tool as follows:

    iothub-explorer <yourConnectionString> create myRasp
    

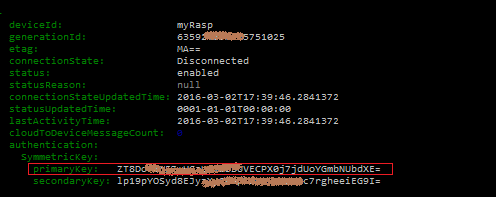
    Remember to use your actual connection string in the above command. The tool will create the new device ID and output the primary key for the device, among other things. The primary key is what you’ll use to connect your device to the IoT Hub.DeviceId

    Creating Device Code to send messages to Azure 

  7. Now we will open our Visual Studio and create a Console Application which will act as our device. Choose Framework “4.6”.
  8. Install  “Microsoft.Azure.Devices” and “Microsoft.Azure.Devices.Client” nugget package as shown below 5
  9. Now we will write the below code to send a simple message in a while loop (mimicking the behaviour the board does ) as below,
    using System;
    using System.Collections.Generic;
    using System.Linq;
    using System.Text;
    using System.Threading.Tasks;
    using Microsoft.Azure.Devices;
    using Microsoft.Azure.Devices.Common.Exceptions;
    using Newtonsoft.Json;
    using System.Threading;
    using Microsoft.Azure.Devices.Client;
    
    namespace DeviceApplication
    {
        class Program
        {
            static RegistryManager registryManager;
            static string connectionString = "{IOT CONN STRING}"; // Refer Step 5
    
            static DeviceClient deviceClient;
            static string iotHubUri = "AdityaHub.azure-devices.net";
            static string deviceKey = "DevicePrimaryKeyGenerated"; // Refer Step 6
            static void Main(string[] args)
            {
                if (!string.IsNullOrEmpty(deviceKey))
                {
                    
                    deviceClient = DeviceClient.CreateFromConnectionString(connectionString, "myRasp", Microsoft.Azure.Devices.Client.TransportType.Http1);
                    SendDeviceToCloudMessagesAsync();
                }
                Console.ReadLine();
            }
    
            static async void SendDeviceToCloudMessagesAsync()
            {
               
    
                var deviceClient = DeviceClient.Create(iotHubUri,
                        Microsoft.Azure.Devices.Client.AuthenticationMethodFactory.
                            CreateAuthenticationWithRegistrySymmetricKey("myRasp", deviceKey),
                        Microsoft.Azure.Devices.Client.TransportType.Http1);
    
                while (true)
                {
                    var str = "Hello, Cloud! from Raspberry" + DateTime.Now.ToString();
                    var message = new Microsoft.Azure.Devices.Client.Message(Encoding.ASCII.GetBytes(str));
                    Console.WriteLine(str);
                    await deviceClient.SendEventAsync(message);
                    Thread.Sleep(2000);
    
                }
            }
    
  10. Now we can copy this application into our Raspberry Pi and run the application. How to copy and run a c# application can be found in my earlier blog here .

    Creating Client Application to read message from Azure sent by our Device

  11. Now we will create an application to receive ingested message’s from Device to Client with Framework 4.6
  12. Install “WindowsAzure.ServiceBus” Nuget into your solution as below,6
  13. Now we will write the code as below,
    using System;
    using System.Collections.Generic;
    using System.Linq;
    using System.Text;
    using System.Threading.Tasks;
    using Microsoft.ServiceBus.Messaging;
    
    namespace DeviceToClientApplication
    {
        class Program
        {
    
            static string connectionString = "HostName=AdityaHub.azure-devices.net;SharedAccessKeyName=iothubowner;SharedAccessKey=iNms9u0rf16zsirifhfgWB43FVe6HZmVcnSNzlEmbqY=";
            static string iotHubD2cEndpoint = "messages/events";
            static EventHubClient eventHubClient;
            static void Main(string[] args)
            {
                Console.WriteLine("Receive messages\n");
                
                eventHubClient = EventHubClient.CreateFromConnectionString(connectionString, iotHubD2cEndpoint);
    
                var d2cPartitions = eventHubClient.GetRuntimeInformation().PartitionIds;
    
                foreach (string partition in d2cPartitions)
                {
                    ReceiveMessagesFromDeviceAsync(partition);
                }
                Console.ReadLine();
            }
    
    
            private async static Task ReceiveMessagesFromDeviceAsync(string partition)
            {
                var eventHubReceiver = eventHubClient.GetDefaultConsumerGroup().CreateReceiver(partition, DateTime.UtcNow);
                while (true)
                {
                    EventData eventData = await eventHubReceiver.ReceiveAsync();
                    if (eventData == null) continue;
    
                    string data = Encoding.ASCII.GetString(eventData.GetBytes());
                    Console.WriteLine(string.Format("Message received. Partition: {0} Data: '{1}'", partition, data));
                }
            }
        }
    }
    
    
  14. Now if you run both of these applications, the devices will send messages to the Azure IOT hub and the application to receive ingested messages will display the same. In your Azure portal also you will be able to visualize the number of messages received.
    In our next article we will have a look at how to store these kind of data into Azure NoSQL databases.

Find below the images of the same. Apologies for the poor resolution.

8


9


7


10

Creating C# application’s on Raspberry Pi

  1. Buy (and receive) : Raspberry Pi kit (Raspberry Pi 2, HDMI cable, Wi-Fi Adapter/LAN wire, USB charger/normal USB driver mobile charger, Memory Card with NOOBS preinstalled)… Done
  2. You would have got NOOBS preinstalled…so OS is ready….Done
  3. Connect Raspberry Pi to internet using your Wi-Fi Adapter.
    •  Open command prompt and type in
      sudo iwlist wlan0 scan
      

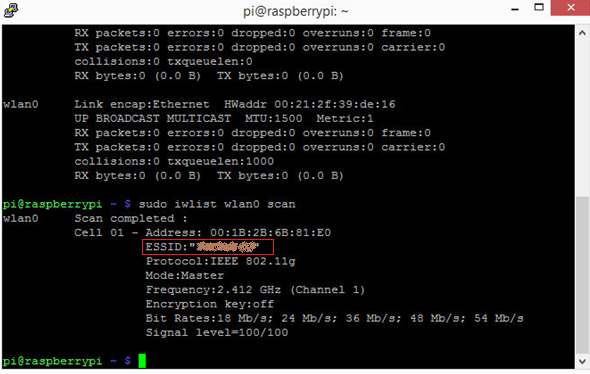
      This will list all the Wi-Fi networks available. You would need to note the ESSID of the network you wish to connect.1

    •  Open the “wpa_supplicant” file as below
      sudo nano /etc/wpa_supplicant/wpa_supplicant.conf
      

      Go to the bottom of the file and type in

      network={
      ssid="The_ESSID_from_earlier"
      psk="Your_wifi_password"
      }
      
    •  Now save the file by pressing Ctrl+X then Y, then finally press Enter.
    •  Reboot your Pi :
       sudo reboot  
    • You can verify if it has successfully connected using
       ifconfig wlan0  

      If the “inet addr” field has an address beside it, the Pi has connected to the network. If not, check your password and ESSID are correct.

  4. Now to write C# applications we need to intall Mono on our Pi
    $ sudo apt-get update
    $ sudo apt-get install mono-runtime
    
  5. To make your mono applications make a REST based calls we would need to install trusted roots certificate from Mozilla as below
    $ sudo mozroots --import --ask-remove --machine
    
  6.  Now open Visual Studio and create any simple “Hello Word” Console Application. Build and generate the ‘.exe’ file.using System;
    public class HelloWorld
    {
    static public void Main ()
    {
    Console.WriteLine ("Hello from Raspberry Pi");
    }
    }
  7. Download FileZilla Client from: https://filezilla-project.org/  . This is used for transferring your files from your desktop to Raspberry Pi.
  8. Once download and install click File -> Site Manager.
    Host: Ip Address of Raspberry Pi ( use command ip addr to get the Ip from Rasp)
    Protocol: SFTP
    Logon Type: Normal
    User: pi
    Password: raspberryThen you will be able to transfer the file.2
  9. Once you have copied your Release folder into Raspberry Pi. I have create a folder called Code and dumped the Debug file. Our Rasp will look as below3
  10. In Raspberry Pi you will be able to run your application as ,
    mono /home/pi/Code/Debug/Device.exe


In our Next Blog, we will learn how to use Azure IOT and connect our Raspberry Pi to Azure and receive messages.