How to Bootstrap and Create .NET Projects

Source: Toptal

To create a .NET project from scratch is as simple as using Visual Studio wizard. Go to File => New Project, or Add New Project to an existing solution. Once a new project has been created, you can start coding right away. However, the default project settings produced by wizards are hardly acceptable for professional teams, because they set a too low bar on quality. Moreover, no wizards can know about other setup steps you need to perform in your particular development environment.

In this article, I will walk you through several important settings you should enable as soon as you create a new project, which is important to minimize a future technical debt. Also, we will review some common practices many .NET developers apply when they are structuring solutions and new projects. Even if you are not applying some of these ideas, it is nice to learn and get an overview of what most teams do.

Structure

Having a well-defined structure is vital for complex projects. This improves the on-boarding experience when newcomers are joining a team, and makes your life easier when you are supporting old projects. There are two key indicators of a good structure:

  • Using solution and project folders
  • Consistent naming

Folders

Solution folders, sometimes referred to as virtual folders, are a very handy instrument to group your projects. In the Solution Explorer view simply right-click and select Add => New Solution Folder, then drag-and-drop any of the existing projects to this new folder. These folders are not mirrored in the file system, letting you keep physical structure unchanged, so moving the projects from one Solution Folder to another does not move them physically.

1

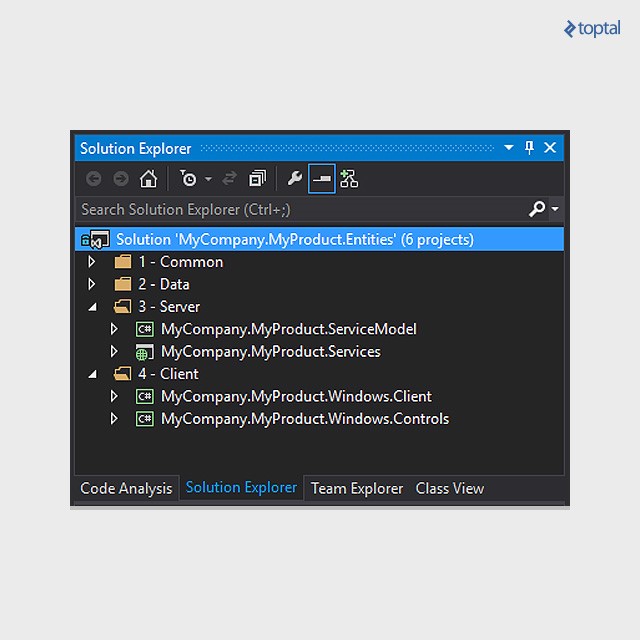
Having numbered prefixes is not required, but it is making the folders appear ordered right in the Solution Explorer window.

Visual Studio can work with multiple solutions at the same time by leveraging Partitioned single solution or Multi-solution models. They are rarely used, so I won’t cover them in this article.

Unlike Solution foldersProject folders match the physical folders structure and therefore persist as real folders on the disk. Moreover, Project folders containing a C# code should match project’s namespace. This makes navigation pretty natural. You can even enable a ReSharper rule to warn on such mismatches.

Naming

There are few recommended rules to apply related to naming:

  • UseCamelCase.
  • A project name should match its output assembly name.
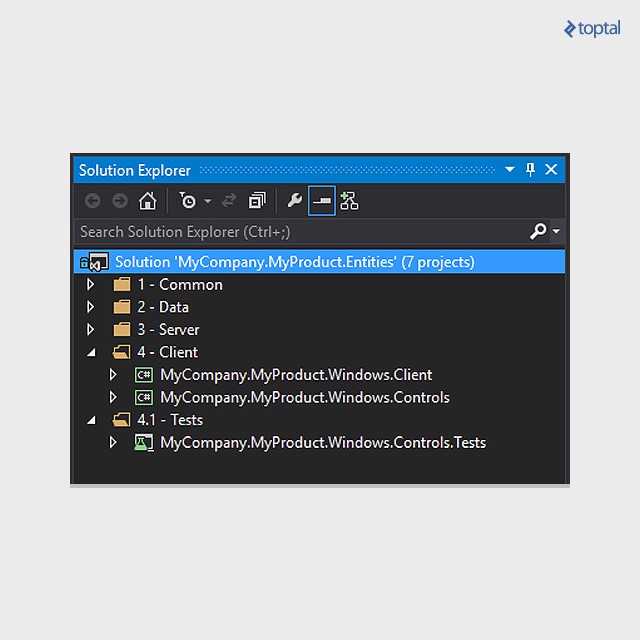
  • A project containing automated tests should have the suffix.Tests.
  • All project names should have a common prefix, like Company.Product.2

There are few reasonable rules as well. You should decide on your own when to apply them based on common sense (and English grammar, of course):

  • Use subjects in plural form when a container (project or folder) contains multiple instances of the same kind (e.g.Tests or Collections).
  • Use singular form when the whole container contains code all about a single entity (e.g. System.Collections.ObjectModel`).
  • For short abbreviations, use upper case likeIO does.
  • For long abbreviations, use CamelCase likeForex..

A rule of thumb: a short abbreviation should not be longer than three characters.

Configuring Solution

Configuring a solution is as simple as providing all infrastructure files you need for your environment. Although some of them can be added later (such as CI integration files), few files you would better have in the very beginning.

ReSharper Settings

If you are professional .NET developer, then you very likely use ReSharper. ReSharper is very flexible in managing its settings. As a team leader, you can create and distribute Team Shared settings which will be used by other developers. Team Shared settings are stored in a file with extension .DotSettings. ReSharper will pick these settings automatically if the file name is matching Visual Studio solution name:

MyCompany.MyProduct.slnMyCompany.MyProduct.sln.DotSettings

Therefore, you should create this file in the very beginning if you ultimately want to apply some settings to the whole team. A good example would be the rule of using (or not using) var keyword. Your Team Shared settings file can have just this one rule, while others are the developers’ preference. It is worth mentioning that the same way ReSharper settings can be set on a per-project level, because you may have some legacy code that you cannot modify (e.g. change to use var keyword).

If you named this file correctly, as shown in the example, then any new instance of Visual Studio with a fresh ReSharper setup will be picking this file automatically and enforce the rules. Do not forget to commit this file to the source control.

StyleCop Rules

Same as ReSharper settings, you can share StyleCop settings. If you use ReSharper, then you are probably having integration plugin installed that will leverage StyleCop from ReSharper. However, StyleCop stores its settings independently in files named Settings.StyleCop. Similarly, you can have this file along with solution file and project files.

If you are using StyleCop, do not forget to run StyleCop configuration tool and disable the checks you do not want to perform. By default, all checks are enabled. Save new settings to this file and commit to the source control.

Text Files

If you are building a public product and are going to publish the source code, do not forget to create and commit these files as well:

README.mdLICENSE

I recommend using markdown format for the README.md file, because it became an industrial standard and supported by public source control services like GitHub, as well as in-house servers like BitBucket (former Stash).

NuGet Specifications

If you are building a library which is to be distributed on NuGet Gallery, then you very likely need to create package specification files, like MyProject.nuspec. I prefer creating these files manually and commit them to the source control. Packages are usually released by one of your Continuous Integration (CI for short) job, but also at any time your can build and publish a package manually from the console as follow:

nuget.exe pack MyLibrary.nuspec

Just don’t forget to increment package version before executing this command.

CI specific files

We all use different CI servers, and they all have different configuration scripts and settings. I would just mention some of the common additions you may consider adding:

  • NUnitsettings, which specify what assemblies contain tests to be executed on CI server for particular jobs. All tests are practically split into a few categories. There are unit tests that should be run on every build, performance tests that are executed nightly, and integration tests are executed on the per-release basis.
  • NCoversettings, which specify what test assemblies should be analyzed for test coverage.
  • SonarQubesettings, which determine software metrics will be collected.
  • Job scripts, such as NAnt, PowerShell or simply Windows batch files.

3

Appropriately bootstrapped project decreases future technical debt and makes product source code readable and professional-looking.

Configuring Projects

Project files, namely .csproj or .vbpro, contain all settings used by Visual Studio and MSBuild. However, not all of them are available from Project Properties window. To edit these files in Visual Studio manually, you should do the following:

  • Right-click on a project in Solution Explorer view.
  • SelectUnload Project .
  • Right-click again to choose actionEdit xyz.csproj.
  • Complete editing.
  • Right-click on the project again, and chooseReload Project.

Alternatively, you can open a project file in your favorite text editor, edit it and save. When you are switching back to Visual Studio window, you will be prompted to reload the changed project.

Warnings Control

Building a high-quality software requires you to never ignore build warnings. Therefore, you should enable the maximum warnings level and treat any warnings as errors. Note that you should do this for all build configurations you have, such as Debug and Release. The best way to do this is to write the following settings to the common property group:

4true

And make sure you don’t have the same settings in other property groups. Otherwise, they will override the corresponding properties from the common group.

FxCop

Running FxCop is merely practical to do on every build. Most teams prefer running FxCop from time to time (usually before a release) to make sure there were no severe errors introduced. However, if you want to perform ultimate checking on every build, add this option:

true

Note that FxCop, like StyleCop, has its own settings which can be placed in the root folder and added to the source control. These settings are likely used when running FxCop on CI servers.

Documentation

This part is about XmlDoc. If you are building a public API, then you should create and maintain API documentation. Most developers start with API development (actual coding), and just before a release they enable project setting Build / XML documentation file. Naturally, after another rebuild a bunch of errors appear, because every missing XmlDoc is resulting in a build error. To avoid this, you should enable mentioned option in the very beginning.

If you are too lazy to write a proper documentation, or you do not like typing too much text, try instruments that automate this process such as GhostDoc.

Code Contracts

Code Contracts is an excellent framework from Microsoft Research, which allows you to express preconditions, postconditions and object invariants in your code for runtime
checking, static analysis, and documentation. I used this in many critical projects, and it helped a lot so I encourage you to give it a try.

If you decide to use Code Contracts, then it is important to enable Contracts at the very beginning, when you have just created a new project. Adding Contracts in the middle of development is possible, but will require changes through many classes, to make Contacts match to each other. So, do not forget to enable all required settings (at least CodeContractsEnableRuntimeChecking) and make sure these settings appear in the common property group.

StyleCop Enforcement

Previously we talked about StyleCop configuration for development time. However, when your project is built on a CI server, ReSharper has no effect there and therefore we should enable StyleCop validation to run with MSBuild.

This is usually done by manual modification of the project file. You need to unload the project in Visual Studio, edit the project file and then load the project back:

<PropertyGroup>   <!— add this to the common property group (common to Debug/Release/etc) —>   <StyleCopTreatErrorsAsWarnings>false</StyleCopTreatErrorsAsWarnings></PropertyGroup> <!— add this Import in the very bottom —><Import Project="$(ProgramFiles)\MSBuild\Microsoft\StyleCop\v4.3\Microsoft.StyleCop.targets">

The setting StyleCopTreatErrorsAsWarnings will do what it says: it will break your build on any StyleCop rule violation. The import element is required for MSBuild to add StyleCop task to the build chain.

You may have noticed the path to Program Files. Because developers may have different StyleCop versions installed, some teams prefer keeping a private copy of the same StyleCop installation under source control. In this case, the path will be relative. This also makes CI machines setup easier, as you don’t need to install StyleCop locally.

AssemblyInfo

Every .NET project created by Visual Studio wizard will have AssemblyInfo.cs file populated automatically (see Properties subfolder) which contains some of the Assembly attributes, but no wizard can fill all the Assembly attributes for you. Make sure you have at least these attributes populated:

  • AssemblyTitle
  • AssemblyDescription
  • AssemblyCompany
  • AssemblyProduct
  • AssemblyCopyright
  • AssemblyVersion

4

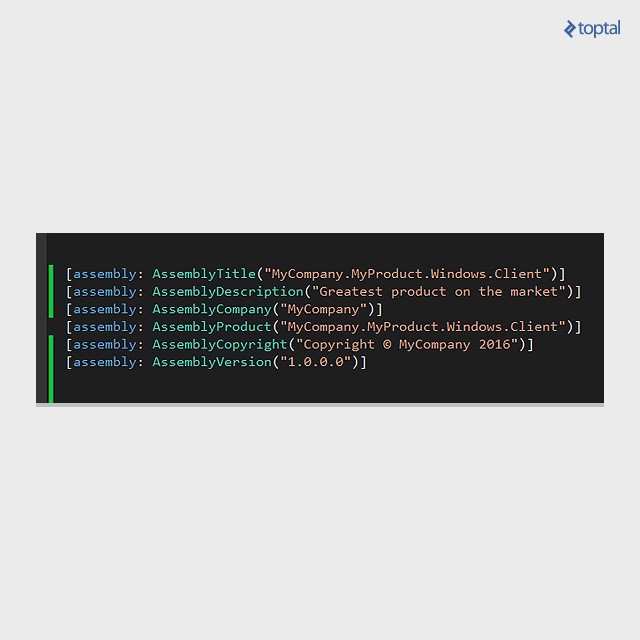
This bare minimum is required for any assemblies you are going to distribute. A practical reason behind this is NuGet: If you are using automatic NuGet specification creation from the selected assembly file, this tool will derive needed information from these properties.

You can also populate one more property in the very beginning:

InternalsVisibleTo

This property makes internal classes and interfaces visible to the specified assembly. This is generally used for automated tests you are going to create for your project.

Connection Strings

How to manage connection strings is a very popular question on the Stack Overflow. The problem is how to make connection strings unique for every developer or a CI job, and not to expose connection details while publishing the source code.

In App.config (for desktop applications) or Web.config (for web applications), make the following setting which will be loading user.config file in runtime. Keep this under your source control:

<?xml version="1.0" encoding="utf-8" ?>
<configuration>       <connectionStrings configSource="user.config"></connectionStrings>
</configuration>

Apparently, user.config file should be excluded from source control, and every developer should have a local copy of this file, preserving connection string privacy:

<connectionStrings>       <add name="test" connectionString="Server=.;Database=...;"/>
</connectionStrings>

.gitignore

For those who use Git as the source control, it is important to add some file patterns to the .gitignore file. However, our smart community has already built a generalized file, which can be found here: github.com/github/gitignore/blob/master/VisualStudio.gitignore.

You should take it as a reference .gitignore file and simply add your custom exclusions you may additionally need.
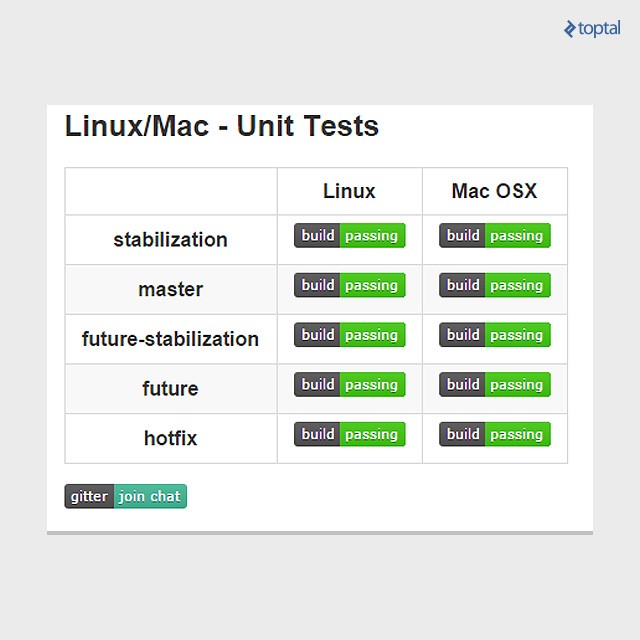
GitHub Badges

You may have seen nice looking badges appearing on the README project’s page. If you are publishing your project on the GitHub, consider connecting your project to public services for:

  • Building: to show a build is failing or passing.
  • Testing: to show test coverage and test execution status.
  • Publishing: to show the latest NuGet package version.

A complete list of badges and related services can be found on shields.io. You may find many interesting badges that are good for Open Source projects.

Once you have registered your project with a selected service, you will be given a link to the image and a complete markdown-syntax link, which you can add to your README.md file. By the way, this is one of the reasons why you should prefer markdown for Readme files.

Sample markdown badges, from the Roslyn project:

[![Build Status]([http://dotnet-ci.cloudapp.net/job/roslyn_master_win_dbg_unit32/badge/icon)](http://dotnet-ci.cloudapp.net/job/roslyn_master_win_dbg_unit32/)](http://dotnet-ci.cloudapp.net/job/roslyn_master_win_dbg_unit32/badge/icon)](http://dotnet-ci.cloudapp.net/job/roslyn_master_win_dbg_unit32/))

[![Join the chat at [https://gitter.im/dotnet/roslyn](https://badges.gitter.im/Join%20Chat.svg)](https://gitter.im/dotnet/roslyn?utm_source=badge&utm_medium=badge&utm_campaign=pr-badge&utm_content=badge)](https://gitter.im/dotnet/roslyn](https://badges.gitter.im/Join%20Chat.svg)](https://gitter.im/dotnet/roslyn?utm_source=badge&utm_medium=badge&utm_campaign=pr-badge&utm_content=badge))

5

Automatic Solution Structure Validation

Even though you have set all the settings we discussed in this article, sooner or later one of your developers may change them and commit the changes to the source control. Sometimes this happens by mistake, and often these changes are not caught during the code review. Other than these accidents, we should be watching for the following common errors:

  • Bad references: when someone is referencing a local assembly which others maybe do not have, or when someone has deleted a file from the disk, while link to that file remains in.csproj  This will break the build for sure, but it may happen too late once the change is pushed, and others pulled it. This is especially crucial for static web files, which you cannot verify during the build.
  • Naming consistency: the tools like StyleCop can control C# source code, but no tools can enforce rules for Project files or Assembly properties. A good example is this: We want to name projects to match output assembly name, and we want project names to have a common prefix likeMyProduct.

I found that watching for these errors in Code Reviews is error prone and should be automated. So I wrote a simple tool that performs these and many other checks to verify the solution consistency. Meet SolutionInspector. This is Open Source and distributed under MIT license. You can build it from source code or install from NuGet:

Install-Package SolutionInspector

The tool walks through the entire solution structure and applies many validation rules. The rules are configured by XML files, placed along with others solution files. To control settings on the per-project basis, you simply add the same file with different settings to the corresponding project folder.

No configuration file is required by default. In this case, the tool will apply all available rules and yield all issues to the console.

Here is the configuration file example:

<?xml version="1.0" encoding="utf-8"?>

<Settings xmlns:xsi="[http://www.w3.org/2001/XMLSchema-instance" xmlns:xsd="http://www.w3.org/2001/XMLSchema">](http://www.w3.org/2001/XMLSchema-instance" xmlns:xsd="http://www.w3.org/2001/XMLSchema">)

<SolutionSettings>
    <MinSolutionFormatVersion>12.00</MinSolutionFormatVersion>
    <MaxSolutionFormatVersion>12.00</MaxSolutionFormatVersion>
    <DetectMissingFiles>true</DetectMissingFiles>
    <ProjectNamePrefix>MyCompany.MyProduct.</ProjectNamePrefix>
    <ProjectNameIsFileName>true</ProjectNameIsFileName>
    <IgnoredProjects>
        AVerySpecialProject1;
        AVerySpecialProject2;
    </IgnoredProjects>
</SolutionSettings>

<ProjectSettings>
    <DetectMissingFiles>true</DetectMissingFiles>
    <AllowBuildEvents>true</AllowBuildEvents>
    <AssemblyNameIsProjectName>true</AssemblyNameIsProjectName>
    <RootNamespaceIsAssemblyName>true</RootNamespaceIsAssemblyName>
    <RequiredImports>StyleCop.MSBuild.Targets</RequiredImports>
    <Properties>
        <TreatWarningsAsErrors>true</TreatWarningsAsErrors>
        <StyleCopTreatErrorsAsWarnings>false</StyleCopTreatErrorsAsWarnings>
    </Properties>
</ProjectSettings>

</Settings>

Although the settings are rather descriptive, I’m going to explain some of them:

  • MinSolutionFormatVersion/ MaxSolutionFormatVersion will prevent your developers from switching Visual Studio version.
  • DetectMissingFilesis very useful for static web content or other non-code files added to the solution or a project.
  • AllowBuildEventscan prevent from adding custom build events, which may do unnecessary things.
  • Propertiesis the most flexible element: you can check any properties against desired values, whether those are known properties or custom.

Azure IOT Hub REST API

Not many people would be familiar with the existence of an REST based Azure IOT API. So if you are working with a client or device which does not have an API for Azure IOT, you can still use Azure IOT due to the REST API exposed both for sending messages to Azure IOT Hub and also receiving them.

In detail documentation is provided at :Azure IOT REST API

We will be looking at a simple example of how to send messages and receive them using this API.

Prerequisites :

1. Azure Account (Obviously !!)
2. Either have a controller/MCU (eg. Raspberry PI) could be Low powered but should have internet access and sending data to the Azure IOT Hub an example is shown Creating C# application’s on Raspberry Pi
3. If you do not have the “things” in step 2, you can always download the “azure-iot-sdks” from GITHUB – Azure IOT SDK . This has a Device Explorer inside “Tools” and you can open this in Visual Studio and “Run”. You will be able to see the screen as below

1

4. Write your own client in any languague (iOS App using Swift / Objective C/ Android App) or Download “POSTMAN” which is a good REST request testing App , you can find POSTMAN

Now lets look at how the Request and Response format for REST based calls are

SEND DEVICE TO CLOUD MESSAGES :

Method Request URI
POST https://{IoTHubName}.azure-devices.net/devices/{deviceId}/messages/events?api-version={api-version}

.

Common Headers

The following information is common to all tasks that you might perform related to IoT Hub:

  • Replace {api-version} with “2016-02-03” in the URI.
  • Replace {IoTHubName} with the name of your IoT hub.
  • Set the Authorization header to a SAS token created as specified in the device section of Using IoT Hub security tokens.

Now the most important step . Before working with any request you would need to generate a SAS (Shared Access Signature) token. 

There are couple of easy ways to generate a token,

  • Using c# code : Inside “Microsoft.Azure.Devices.Common.Security” you will have “SharedAccessSignatureBuilder” which we will make use of. So you would need to add “Microsoft.Azure.Devices” Nuget packageCode would be as below,
 try
            {
                var builder = new SharedAccessSignatureBuilder()
                {
                    KeyName = keyNameTextBox.Text,
                    Key = keyValueTextBox.Text,
                    Target = targetTextBox.Text,
                    TimeToLive = TimeSpan.FromDays(Convert.ToDouble(numericUpDownTTL.Value))
                }.ToSignature();

                sasRichTextBox.Text = builder + "\r\n";
            }
            catch (Exception ex)
            {
                using (new CenterDialog(this))
                {
                    MessageBox.Show($"Unable to generate SAS. Verify connection strings.\n{ex.Message}", "Error", MessageBoxButtons.OK, MessageBoxIcon.Error);
                }
            }

This would generate a SAS token.

    • Using Device Explorer :Copy the IOT Hub Connection string from the Azure Portal. Open Device explorer as explained in Ste 3 of prerequisites, and in the “Configuration” tab input the Connection string and press update as below,1

A SAS Token would be generated

Using either of the procedure you will have a SAS token.

Now we will use POSTMAN (lazy to create a Client) to send a POST request to our Azure IOT Hub.  For those who are familiar with POSTMAN or any other REST API test client you need to create a header as shown below.

2

I have added a “Request Header” called “Authorization” and added generated SAS Token as its value.  The Content type i have kept as “application/xml” .

The URL i have build using the standard given above which turns out as below

https://AdityaHub.azure-devices.net/devices/myRasp/messages/events?api-version=2016-02-03

You can send in a request using this and we will be able to see the messages either in the Azure Portal / Device Explorer (In “Data” tab click Monitor) as shown below,

3

4

As you would be able to see, i have sent a message called “555” and it is being shown in both Device explorer and Azure Portal.

RECEIVE A CLOUD TO DEVICE MESSAGE :

Method Request URI
GET https://{IoTHubName}.azure-devices.net/devices/{deviceId}/messages/devicebound?api-version={api-version}

In URL is slightly changed from using Events in the POST to using Device Bound in GET Request.

In this also we will need to use a SAS token as shown above. We will change the URL as below for our GET Request.

https://AdityaHub.azure-devices.net/devices/myRasp/messages/devicebound?api-version=2016-02-03

We will use POSTMAN  to get a response and Device Explorer to send a message as shown below,

5

The message sent is now visible as a Response.

You would also be able to see below messages in the Header,

6

Thus with this Azure IOT REST API, you would not need to worry on the API availability for your client. Even from your device perspective, if it has a REST Service call capability, you can use that and send a request. You will also be able to Complete , Reject or Abandon a message using the REST services. You can visit the In detail API reference as shared above.

Azure WCF Rest Service – CORS Issue

What is CORS ? 

A resource makes a cross-origin HTTP request when it requests a resource from a different domain than the one which the first resource itself serves. For example, an HTML page served from http://domain-a.com makes an <img> src request for http://domain-b.com/image.jpg. Many pages on the web today load resources like CSS stylesheets, images and scripts from separate domains.

For security reasons, browsers restrict cross-origin HTTP requests initiated from within scripts.  For example, XMLHttpRequest follows the same-origin policy. So, a web application using XMLHttpRequestcould only make HTTP requests to its own domain. To improve web applications, developers asked browser vendors to allow XMLHttpRequest to make cross-domain requests.

The W3C Web Applications Working Group recommends the new Cross-Origin Resource Sharing(CORS) mechanism. CORS gives web servers cross-domain access controls, which enable secure cross-domain data transfers. Modern browsers use CORS in an API container – such as XMLHttpRequest – to mitigate risks of cross-origin HTTP requests.

How does it work ?

The Cross-Origin Resource Sharing standard works by adding new HTTP headers that allow servers to describe the set of origins that are permitted to read that information using a web browser.  Additionally,  for HTTP methods other than GET, or for POST usage with certain MIME types, the specification mandates that browsers “preflight” the request, soliciting supported methods from the server with an HTTPOPTIONS request method, and then, upon “approval” from the server, sending the actual request with the actual HTTP request method.  Servers can also notify clients whether “credentials” (including Cookies and HTTP Authentication data) should be sent with requests.

Source : Mozilla Developer – CORS

How does a Preflight error look like ?

1

If you look at the above error, you will get a error called “CORS preflight channel did not succeed”

What was i trying to solve ?

I was writing a supposed to be easy Azure Cloud service. I created a WCF Web Role in my Cloud Project and my Service Interface is as below :

[ServiceContract]
    public interface IService1
    {

        #region Getters
        [WebGet(UriTemplate = "/GetUsers",
 RequestFormat = WebMessageFormat.Json,
 ResponseFormat = WebMessageFormat.Json,
 BodyStyle = WebMessageBodyStyle.Bare)]
        string GetUsers();

        [WebGet(UriTemplate = "/GetUser/{Id}")]
        string GetUser(string Id);

        #endregion

        #region Create Methods

        [WebInvoke(Method = "POST", UriTemplate = "/AddUser",
         BodyStyle = WebMessageBodyStyle.Wrapped, RequestFormat = WebMessageFormat.Json, ResponseFormat = WebMessageFormat.Json)]
        [OperationContract]
        bool AddUser(User user);

        [WebInvoke(Method = "POST", UriTemplate = "/AddUserDetails",
         BodyStyle = WebMessageBodyStyle.Wrapped, RequestFormat = WebMessageFormat.Json, ResponseFormat = WebMessageFormat.Json)]
        [OperationContract]
        bool AddUserDetails(UserDetail userdetails);
        #endregion

        #region Update Methods

        [WebInvoke(Method = "PUT", UriTemplate = "/UpdateUser",
         BodyStyle = WebMessageBodyStyle.Wrapped, RequestFormat = WebMessageFormat.Json, ResponseFormat = WebMessageFormat.Json)]
        [OperationContract]
        bool UpdateUser(User user);

        [WebInvoke(Method = "PUT", UriTemplate = "/UpdateUserDetails",
         BodyStyle = WebMessageBodyStyle.Wrapped, RequestFormat = WebMessageFormat.Json, ResponseFormat = WebMessageFormat.Json)]
        [OperationContract]
        bool UpdateUserDetails(UserDetail userdetails);
        #endregion

        #region Delete Methods

        [OperationContract]
        [WebInvoke(Method = "DELETE",
       UriTemplate = "/DeleteUser/{Id}",
       BodyStyle = WebMessageBodyStyle.Wrapped, RequestFormat = WebMessageFormat.Json, ResponseFormat = WebMessageFormat.Json)]
        bool DeleteUser(string Id);

        [OperationContract]
        [WebInvoke(Method = "DELETE",
         UriTemplate = "/DeleteUserDetails/{Id}",
         BodyStyle = WebMessageBodyStyle.Wrapped, RequestFormat = WebMessageFormat.Json, ResponseFormat = WebMessageFormat.Json)]
        bool DeleteUserDetails(string Id);
        #endregion

        [OperationContract]
        [WebGet(UriTemplate = "/IsValidUser/{username}/{password}",
 RequestFormat = WebMessageFormat.Json,
 ResponseFormat = WebMessageFormat.Json,
 BodyStyle = WebMessageBodyStyle.Bare)]
        string IsValidUser(string username, string password);
    }

This is a service for CRUD operation on User and User Detail. Service Implementation is just calling the Database and performing the operation using LINQ to SQL.

After i complete my implementation and try to locally check in either “POSTMAN” or “Advance REST Client” (both being tools to work with REST Service) the request and response was proper. But after i deploy this in Azure, i was getting a Preflight error as shown earlier.

Solution :

We had to add “Access-Control-Allow-Origin” in the request header, and ask the WCF REST service to allow preflight request. Sometimes, depending on your browser a “POST” request may also end up being “OPTION” request.

So, we have to follow below steps to solve the problem,

1. Add a new Global.asax (Active Server Application file) in the WCF service if you do not have one.

2. Update the code in the “Application_BeginRequest” method as below,

protected void Application_BeginRequest(object sender, EventArgs e)
        {
            HttpContext.Current.Response.AddHeader("Access-Control-Allow-Origin", "*");
            if (HttpContext.Current.Request.HttpMethod == "OPTIONS")
            {
                HttpContext.Current.Response.AddHeader("Cache-Control", "no-cache");
                HttpContext.Current.Response.AddHeader("Access-Control-Allow-Methods", "POST, GET,PUT, OPTIONS, DELETE");
                HttpContext.Current.Response.AddHeader("Access-Control-Allow-Headers", "Content-Type, Accept");
                HttpContext.Current.Response.AddHeader("Access-Control-Max-Age", "1728000");
                HttpContext.Current.Response.End();
            }
        }

With this you will be able to see “Access-Control-Allow-Origin” in the request header.
A sample POSTMAN request is as below,

2
But sometimes the REST test Clients would send the request without any problems, but when working with Client (in this case Ionic Framework for cross platform app development) we may still get the error.

How to real time test it ?

I have written a simple “AJAX” client to test this as below,

<div>
    <select id="method">
<option value="get">POST</option>
<option value="post">GET</option>
<option value="put">PUT</option>
</select>
    <input type="button" value="Try it" onclick="sendRequest()" />
    <span id='value1'>(Result)</span></div>
@section scripts {
    <script>
        // TODO: Replace with the URL of your WebService app
        var serviceUrl = 'http://yoururl.cloudapp.net/Service1.svc/UpdateUser';
        var user =
              {
                  "user":
    {
        "Id": "28",
        "UserName": "K999",
        "Password": "k999",
        "IsAdmin": 1
    }
              }


        function sendRequest() {
            var method = $('#method').val();

            $.ajax({
                type: "PUT",
                url: serviceUrl,
                data: JSON.stringify(user),
                crossDomain: true,
                contentType: "application/json; charset=utf-8", // to the server
                ProcessData: true,
            }).done(function (data) {
                $('#value1').text(data);
            }).error(function (jqXHR, textStatus, errorThrown) {
                $('#value1').text(jqXHR.responseText || textStatus);
            });
        }
    </script>
}

Hope it helps somebody. Happy coding !!

Azure IOT with Raspberry Pi

Prerequisites : https://adityaswami89.wordpress.com/2016/03/01/creating-c-applications-on-raspberry-pi/

  1. Open your Azure management portal (https://portal.azure.com/)
  2. Click on New -> Internet of Things -> Azure IOT Hub 1
  3. Choose the appropriate name, pricing standard you could choose as free if this is your first IOT Application. Azure allows 1 free pricing to be chosen. Click Create.2
  4. The deployment will start and will take couple of minutes to finish. 3
  5. After deployment , select the created IOT Hub and make a note of the “Hostname” and “Primary connection string as shown below”4
    Creating Device ID 
  6. Once you’ve set up your instance of IoT Hub, the first thing you need is to create the identity for your device. Every device must have a key that uniquely identifies it to the service. This way the IoT Hub can securely associate the data with the device that sent it.
    To create a device ID, use a tool called ‘iothub-explorer’. The tool requires Node.js, so make sure it’s installed on your machine (or get it NodeJS).
    Now open the command line prompt and install the iothub-explorer package:

    npm install -g iothub-explorer@latest
    

    The tool will need the connection string to connect to your instance of the Azure IoT Hub. You can find the connection string in the Azure Portal under the settings tab of your IoT Hub instance: navigate to Settings | Shared access policies | Connection string – primary key.
    Now create a new device called ‘myRasp’. Run the tool as follows:

    iothub-explorer <yourConnectionString> create myRasp
    

    Remember to use your actual connection string in the above command. The tool will create the new device ID and output the primary key for the device, among other things. The primary key is what you’ll use to connect your device to the IoT Hub.DeviceId

    Creating Device Code to send messages to Azure 

  7. Now we will open our Visual Studio and create a Console Application which will act as our device. Choose Framework “4.6”.
  8. Install  “Microsoft.Azure.Devices” and “Microsoft.Azure.Devices.Client” nugget package as shown below 5
  9. Now we will write the below code to send a simple message in a while loop (mimicking the behaviour the board does ) as below,
    using System;
    using System.Collections.Generic;
    using System.Linq;
    using System.Text;
    using System.Threading.Tasks;
    using Microsoft.Azure.Devices;
    using Microsoft.Azure.Devices.Common.Exceptions;
    using Newtonsoft.Json;
    using System.Threading;
    using Microsoft.Azure.Devices.Client;
    
    namespace DeviceApplication
    {
        class Program
        {
            static RegistryManager registryManager;
            static string connectionString = "{IOT CONN STRING}"; // Refer Step 5
    
            static DeviceClient deviceClient;
            static string iotHubUri = "AdityaHub.azure-devices.net";
            static string deviceKey = "DevicePrimaryKeyGenerated"; // Refer Step 6
            static void Main(string[] args)
            {
                if (!string.IsNullOrEmpty(deviceKey))
                {
                    
                    deviceClient = DeviceClient.CreateFromConnectionString(connectionString, "myRasp", Microsoft.Azure.Devices.Client.TransportType.Http1);
                    SendDeviceToCloudMessagesAsync();
                }
                Console.ReadLine();
            }
    
            static async void SendDeviceToCloudMessagesAsync()
            {
               
    
                var deviceClient = DeviceClient.Create(iotHubUri,
                        Microsoft.Azure.Devices.Client.AuthenticationMethodFactory.
                            CreateAuthenticationWithRegistrySymmetricKey("myRasp", deviceKey),
                        Microsoft.Azure.Devices.Client.TransportType.Http1);
    
                while (true)
                {
                    var str = "Hello, Cloud! from Raspberry" + DateTime.Now.ToString();
                    var message = new Microsoft.Azure.Devices.Client.Message(Encoding.ASCII.GetBytes(str));
                    Console.WriteLine(str);
                    await deviceClient.SendEventAsync(message);
                    Thread.Sleep(2000);
    
                }
            }
    
  10. Now we can copy this application into our Raspberry Pi and run the application. How to copy and run a c# application can be found in my earlier blog here .

    Creating Client Application to read message from Azure sent by our Device

  11. Now we will create an application to receive ingested message’s from Device to Client with Framework 4.6
  12. Install “WindowsAzure.ServiceBus” Nuget into your solution as below,6
  13. Now we will write the code as below,
    using System;
    using System.Collections.Generic;
    using System.Linq;
    using System.Text;
    using System.Threading.Tasks;
    using Microsoft.ServiceBus.Messaging;
    
    namespace DeviceToClientApplication
    {
        class Program
        {
    
            static string connectionString = "HostName=AdityaHub.azure-devices.net;SharedAccessKeyName=iothubowner;SharedAccessKey=iNms9u0rf16zsirifhfgWB43FVe6HZmVcnSNzlEmbqY=";
            static string iotHubD2cEndpoint = "messages/events";
            static EventHubClient eventHubClient;
            static void Main(string[] args)
            {
                Console.WriteLine("Receive messages\n");
                
                eventHubClient = EventHubClient.CreateFromConnectionString(connectionString, iotHubD2cEndpoint);
    
                var d2cPartitions = eventHubClient.GetRuntimeInformation().PartitionIds;
    
                foreach (string partition in d2cPartitions)
                {
                    ReceiveMessagesFromDeviceAsync(partition);
                }
                Console.ReadLine();
            }
    
    
            private async static Task ReceiveMessagesFromDeviceAsync(string partition)
            {
                var eventHubReceiver = eventHubClient.GetDefaultConsumerGroup().CreateReceiver(partition, DateTime.UtcNow);
                while (true)
                {
                    EventData eventData = await eventHubReceiver.ReceiveAsync();
                    if (eventData == null) continue;
    
                    string data = Encoding.ASCII.GetString(eventData.GetBytes());
                    Console.WriteLine(string.Format("Message received. Partition: {0} Data: '{1}'", partition, data));
                }
            }
        }
    }
    
    
  14. Now if you run both of these applications, the devices will send messages to the Azure IOT hub and the application to receive ingested messages will display the same. In your Azure portal also you will be able to visualize the number of messages received.
    In our next article we will have a look at how to store these kind of data into Azure NoSQL databases.

Find below the images of the same. Apologies for the poor resolution.

8


9


7


10

Creating C# application’s on Raspberry Pi

  1. Buy (and receive) : Raspberry Pi kit (Raspberry Pi 2, HDMI cable, Wi-Fi Adapter/LAN wire, USB charger/normal USB driver mobile charger, Memory Card with NOOBS preinstalled)… Done
  2. You would have got NOOBS preinstalled…so OS is ready….Done
  3. Connect Raspberry Pi to internet using your Wi-Fi Adapter.
    •  Open command prompt and type in
      sudo iwlist wlan0 scan
      

      This will list all the Wi-Fi networks available. You would need to note the ESSID of the network you wish to connect.1

    •  Open the “wpa_supplicant” file as below
      sudo nano /etc/wpa_supplicant/wpa_supplicant.conf
      

      Go to the bottom of the file and type in

      network={
      ssid="The_ESSID_from_earlier"
      psk="Your_wifi_password"
      }
      
    •  Now save the file by pressing Ctrl+X then Y, then finally press Enter.
    •  Reboot your Pi :
       sudo reboot  
    • You can verify if it has successfully connected using
       ifconfig wlan0  

      If the “inet addr” field has an address beside it, the Pi has connected to the network. If not, check your password and ESSID are correct.

  4. Now to write C# applications we need to intall Mono on our Pi
    $ sudo apt-get update
    $ sudo apt-get install mono-runtime
    
  5. To make your mono applications make a REST based calls we would need to install trusted roots certificate from Mozilla as below
    $ sudo mozroots --import --ask-remove --machine
    
  6.  Now open Visual Studio and create any simple “Hello Word” Console Application. Build and generate the ‘.exe’ file.using System;
    public class HelloWorld
    {
    static public void Main ()
    {
    Console.WriteLine ("Hello from Raspberry Pi");
    }
    }
  7. Download FileZilla Client from: https://filezilla-project.org/  . This is used for transferring your files from your desktop to Raspberry Pi.
  8. Once download and install click File -> Site Manager.
    Host: Ip Address of Raspberry Pi ( use command ip addr to get the Ip from Rasp)
    Protocol: SFTP
    Logon Type: Normal
    User: pi
    Password: raspberryThen you will be able to transfer the file.2
  9. Once you have copied your Release folder into Raspberry Pi. I have create a folder called Code and dumped the Debug file. Our Rasp will look as below3
  10. In Raspberry Pi you will be able to run your application as ,
    mono /home/pi/Code/Debug/Device.exe


In our Next Blog, we will learn how to use Azure IOT and connect our Raspberry Pi to Azure and receive messages.

IDataErrorInfo with Fluent Validation

Fluent validation: A small validation library for .NET that uses a fluent interface and lambda expressions for building validation rules for your business objects.

Codeplex link: https://fluentvalidation.codeplex.com/ 

With Fluent validation we can avoid repetitive code by using the power of lambda expressions. Fluent validation has built in validators like:

NotNull Validator
NotEmpty Validator
NotEqual Validator
Equal Validator
Length Validator
Less Than Validator
Less Than Or Equal Validator
Greater Than Validator
GreaterThan Or Equal Validator
Predicate Validator (aka Must)
RegEx Validator
Email Validator 

Also apart from this you can use your own custom logic with supported error messages. For XAML application we can combine this power with our own IDataErrorInfo.

We will see this with a simple example. Before we go into the example, you can use the NUGET to download Fluent Validation dll’s.

We will first look at the Validation class with Fluent validation: 


using System;
using System.Collections.Generic;
using System.Linq;
using System.Text;
using System.Threading.Tasks;
using FluentValidation;

namespace FluentApplication
{
    public class ModelValidator : AbstractValidator<Model>
    {

        public  ModelValidator()
        {
            RuleFor(model => model.ID).NotEmpty();
            //Custom rule example
            RuleFor(model => model.ID).Must(IsNumber).WithMessage("This is not a number");
            RuleFor(model => model.ID).LessThan(10).WithMessage("ID should be less than 10");
            RuleFor(model => model.Name).NotEmpty();
            RuleFor(model => model.Name).Length(1, 5);

        }


        //Take the datatype of the passing paramter. i.e in this case
        // model.ID is of type int so it will take paramter of int and the value 
        // of model.ID is transferred to this method here automatically
        private bool IsNumber(int ID)
        {
            // You can write your logic here 
            return true;
        }


    }
}

From above we are using AbstractValidator for firing the validation for the model. We give it some rules based on the properties for firing. I have used NotEmpty, LessThan, Length which are in-built properties of Fluent Validation. As you can also see I have used a custom validation through ‘must’ keyword. The Input parameter of the custom method will always reflect the datatype of the calling property. Thus in this case as I have written a custom property for ‘ID’ which is of type ‘Int’ the input parameter of my Method ‘IsNumber’ will carry always the value of passing property, in this case ‘ID’.

You can also use this to trigger children validation , for eg: If you are validating Address you can further trigger internal properties of Address i.e pincode, street names etc.

We will now see the Model which is a generic implementation of MVVM.


using FluentValidation.Results;
using System;
using System.Collections.Generic;
using System.ComponentModel;
using System.Linq;
using System.Text;
using System.Threading.Tasks;
using FluentValidation;

namespace FluentApplication
{
   public class Model : BaseClass,IDataErrorInfo
    {
       
        private int _id;
        public int ID 
        {
            get
            {
                return _id;
            }
            set
            {
                _id = value;               
            }
        }

        private string _name;
        public string Name
        {
            get
            {
                return _name;
            }
            set
            {
                _name = value;
               
            }
        }

        private string _error;
        public string Error
        {
            get
            {
                return _error;
            }
            set
            {
                _error = value;
            }
        }

        public string this[string columnName]
        {
            get 
            {
                Validator = new ModelValidator();
                if (columnName == "Name")
                {
                    if (Validator.Validate(this, "Name").Errors.Any())
                        return Validator.Validate(this, "Name").Errors.FirstOrDefault().ErrorMessage;
                    else
                    {
                        Validator = null;
                        return string.Empty;
                    }
                }
                if (columnName == "ID")
                {
                    if (Validator.Validate(this, "ID").Errors.Any())
                        return Validator.Validate(this, "ID").Errors.FirstOrDefault().ErrorMessage;
                    else
                    {  
                        Validator = null;
                        return string.Empty;
                    }
                }

                return string.Empty;
            }
        }
    }
}


From above I have implemented the IDataErrorInfo which will internally fire up the FluentValidation. You can fire up for a single property or fire validation for the entire Model. I would prefer each property gets call to its own validation.

Based on the requirement you can use any of the approaches above.

BaseClass implementation is just for INotifyPropertyChanged which is shown below,


using FluentValidation.Results;
using System;
using System.Collections.Generic;
using System.ComponentModel;
using System.Linq;
using System.Text;
using System.Threading.Tasks;

namespace FluentApplication
{

   public class BaseClass : INotifyPropertyChanged
    {
        public List<ValidationResult> ValidationResults { get; set; }
        public ModelValidator Validator { get; set; }
        #region NotifyEvents

        public event PropertyChangedEventHandler PropertyChanged;
        protected void OnPropertyChanged(string name)
        {

            PropertyChangedEventHandler handler = PropertyChanged;
            if (handler != null)
            {
                handler(this, new PropertyChangedEventArgs(name));
            }
        }

        #endregion

    }
}


Now we will look at the view model which is a normal MVVM based VM, 


using System;
using System.Collections.Generic;
using System.Collections.ObjectModel;
using System.Linq;
using System.Text;
using System.Threading.Tasks;

namespace FluentApplication
{

    class ViewModel
    {
        public ViewModel()
        {
            ModelLists = new ObservableCollection<Model>();
            ModelLists.Add(new Model() {ID = 1,Name="Adi" });
            ModelLists.Add(new Model() { ID = 2, Name = "Abi" });
        }

        public ObservableCollection<Model> ModelLists { get; set; }
    }
}


And now we will have a look at the View. 


<Window x:Class="FluentApplication.MainWindow"
        xmlns="http://schemas.microsoft.com/winfx/2006/xaml/presentation"
        xmlns:x="http://schemas.microsoft.com/winfx/2006/xaml"
        Title="MainWindow" Height="350" Width="525">
    <Grid>
        <DataGrid x:Name="dgMain" ItemsSource="{Binding ModelLists,Mode=TwoWay,ValidatesOnDataErrors=True,ValidatesOnNotifyDataErrors=True,UpdateSourceTrigger=PropertyChanged}" AutoGenerateColumns="False" Margin="22,1,31,161" RenderTransformOrigin="0.5,0.5">
            <DataGrid.RenderTransform>
                <TransformGroup>
                    <ScaleTransform/>
                    <SkewTransform AngleY="0.669"/>
                    <RotateTransform/>
                    <TranslateTransform Y="1.962"/>
                </TransformGroup>
            </DataGrid.RenderTransform>
            <DataGrid.Columns>
                <DataGridTextColumn Header="ID" Binding="{Binding ID,UpdateSourceTrigger=LostFocus,ValidatesOnDataErrors=True}"/>
                    <DataGridTextColumn Header="Name" Binding="{Binding Name,UpdateSourceTrigger=LostFocus,ValidatesOnDataErrors=True}"/>
            </DataGrid.Columns>
        </DataGrid>
    </Grid>
</Window>


Creating Powerpoint table using ‘OpenXML’ with XAML applications

I was recently struck with creating a powerpoint presentation with a table in it using OpenXml, googling did not help me a lot, so below is the solution.

I need to mention a thing here , i was struck ‘n’ number of times in between and a tool named ‘Open XML SDK 2.5 for Microsoft Office’ helped me solve the problems. I would seriously recommend this tool if you are trying to create your own structure using OpenXML. This accurately tells where the problem lies and what is expected and missing . (It isnt that easy to use this tho !!!). It shows an XML node and you need to find that and add/remove as the tool tells.

You can download it from : here

Below we will be able to see how to use OpenXml to create a powerpoint presentation with table in it.

Hope you have prior knowledge of how to create a WCF service :0/ .

Kindly reference or add namespaces as below. You will also need to download OpenXml dll’s from Nuget.

using System;
using System.Linq;
using System.Runtime.Serialization;
using System.ServiceModel;
using System.ServiceModel.Activation;
using P14 = DocumentFormat.OpenXml.Office2010.PowerPoint;
using System.Collections.Generic;
using System.Text;
using P = DocumentFormat.OpenXml.Presentation;
using D = DocumentFormat.OpenXml.Drawing;
using DocumentFormat.OpenXml.Presentation;
using DocumentFormat.OpenXml;
using DocumentFormat.OpenXml.Packaging;
using System.IO;
using System.ComponentModel;    

Our Service will look as below:

    [ServiceContract(Namespace = "")]
    [SilverlightFaultBehavior]
    [AspNetCompatibilityRequirements(RequirementsMode = AspNetCompatibilityRequirementsMode.Allowed)]
   
    [KnownType(typeof(Configuration))]
    public class Service
    {
        //location where powerpoint template file is available.here bin directory is used. 
        //however the location can be set in config file and read it from there if the template ppt should not be a part of the project
        string templateFilePath = Path.Combine(string.Format("{0}\\bin", AppDomain.CurrentDomain.BaseDirectory), "Template.pptx");
        //location where a copy of template file to be created.(will be deleted once the byte array is created)
        string tempFilePath = Path.Combine(string.Format("{0}\\bin", AppDomain.CurrentDomain.BaseDirectory), string.Format("Template_{0}.pptx", new Guid()));

        /// <summary>
        /// Append Table into Last Slide
        /// </summary>
        /// <param name="presentationDocument"></param>
        [OperationContract]
        public byte[] CreateTableInLastSlide(List<Configuration> configurations)
        {


            CreatePresentation();

        
            PresentationDocument presentationDocument = PresentationDocument.Open(tempFilePath, true);
            
            // Get the presentation Part of the presentation document
            PresentationPart presentationPart = presentationDocument.PresentationPart;

            // Get the Slide Id collection of the presentation document
            var slideIdList = presentationPart.Presentation.SlideIdList;

            if (slideIdList == null)
            {
                throw new NullReferenceException("The number of slide is empty, please select a ppt with a slide at least again");
            }

            // Get all Slide Part of the presentation document
            var list = slideIdList.ChildElements
                        .Cast<SlideId>()
                        .Select(x => presentationPart.GetPartById(x.RelationshipId))
                        .Cast<SlidePart>();

            // Get the last Slide Part of the presentation document
            var tableSlidePart = (SlidePart)list.Last();


            P.GraphicFrame graphicFrame = tableSlidePart.Slide.CommonSlideData.ShapeTree.AppendChild(new P.GraphicFrame(new P.NonVisualGraphicFrameProperties
                (new P.NonVisualDrawingProperties() { Id = 1, Name = "xyz" }, new P.NonVisualGraphicFrameDrawingProperties(), new ApplicationNonVisualDrawingProperties())));


            graphicFrame.Transform = new Transform(new D.Offset() { X = 10, Y = 10 });
            //graphicFrame.Transform = new Transform(new DocumentFormat.OpenXml.Drawing.ChartDrawing.NonVisualGraphicFrameDrawingProperties());
            graphicFrame.Graphic = new D.Graphic(new D.GraphicData(GenerateTable(configurations)) { Uri = "http://schemas.openxmlformats.org/drawingml/2006/table" });
            presentationPart.Presentation.Save();
            presentationDocument.Close();
            byte[] pptByte = File.ReadAllBytes(tempFilePath);
            File.Delete(tempFilePath);
            return pptByte;

        }


        /// <summary>
        /// Generate Table as below order:
        /// a:tbl(Table) ->a:tr(TableRow)->a:tc(TableCell)
        /// We can return TableCell object with CreateTextCell method
        /// and Append the TableCell object to TableRow 
        /// </summary>
        /// <returns>Table Object</returns>

        private D.Table GenerateTable(List<Configuration> configurations)
        {
            

            // Declare and instantiate table 
            D.Table table = new D.Table();

            // Specify the required table properties for the table
            D.TableProperties tableProperties = new D.TableProperties() { FirstRow = true, BandRow = true };
            D.TableStyleId tableStyleId = new D.TableStyleId();
            tableStyleId.Text = "{5C22544A-7EE6-4342-B048-85BDC9FD1C3A}";

            tableProperties.Append(tableStyleId);

            // Declare and instantiate tablegrid and colums depending on your columns
            D.TableGrid tableGrid1 = new D.TableGrid();
            D.GridColumn gridColumn1 = new D.GridColumn() { Width = 1048000L };
            D.GridColumn gridColumn2 = new D.GridColumn() { Width = 1048000L };
           

            tableGrid1.Append(gridColumn1);
            tableGrid1.Append(gridColumn2);
            
            table.Append(tableProperties);
            table.Append(tableGrid1);

            D.TableRow tableRow1 = new D.TableRow() { Height = 370840L };
            var list = GetPropertiesNameOfClass(configurations.FirstOrDefault());
            foreach (var item in list)
            {
                tableRow1.Append(CreateTextCell(item.ToString()));
            }
            table.Append(tableRow1);

            foreach (var config in configurations)
            {
                D.TableRow tableRow = new D.TableRow() { Height = 370840L };
                foreach (var prop in config.GetType().GetProperties())
                {
                    tableRow.Append(CreateTextCell(prop.GetValue(config, null).ToString()));
                }
                table.Append(tableRow);
            }

            return table;
        }

        public List<string> GetPropertiesNameOfClass(object pObject)
        {
            List<string> propertyList = new List<string>();
            PropertyDescriptorCollection properties = TypeDescriptor.GetProperties(pObject);

            foreach (PropertyDescriptor property in properties)
            {
               
                    propertyList.Add(property.DisplayName);
                
            }
           
            return propertyList;
        }

        /// <summary>
        /// Create table cell with the below order:
        /// a:tc(TableCell)->a:txbody(TextBody)->a:p(Paragraph)->a:r(Run)->a:t(Text)
        /// </summary>
        /// <param name="text">Inserted Text in Cell</param>
        /// <returns>Return TableCell object</returns>

        private D.TableCell CreateTextCell(string text)
        {
            if (string.IsNullOrEmpty(text))
            {
                text = string.Empty;
            }

            // Declare and instantiate the table cell 
            // Create table cell with the below order:
            // a:tc(TableCell)->a:txbody(TextBody)->a:p(Paragraph)->a:r(Run)->a:t(Text)
            D.TableCell tableCell = new D.TableCell();

            //  Declare and instantiate the text body
            D.TextBody textBody = new D.TextBody();
            D.BodyProperties bodyProperties = new D.BodyProperties();
            D.ListStyle listStyle = new D.ListStyle();

            D.Paragraph paragraph = new D.Paragraph();
            D.Run run = new D.Run();
            D.RunProperties runProperties = new D.RunProperties() { Language = "en-US", Dirty = false };
            D.Text text2 = new D.Text();
            text2.Text = text;
            run.Append(runProperties);
            run.Append(text2);
            D.EndParagraphRunProperties endParagraphRunProperties = new D.EndParagraphRunProperties() { Language = "en-US", Dirty = false };

            paragraph.Append(run);
            paragraph.Append(endParagraphRunProperties);
            textBody.Append(bodyProperties);
            textBody.Append(listStyle);
            textBody.Append(paragraph);

            D.TableCellProperties tableCellProperties = new D.TableCellProperties();
            tableCell.Append(textBody);
            tableCell.Append(tableCellProperties);

            return tableCell;
        }

        [OperationContract]
        public void CreatePresentation()
        {
            
            
            // Create a presentation at a specified file path. The presentation document type is pptx, by default.
            PresentationDocument presentationDoc = PresentationDocument.Create(tempFilePath, PresentationDocumentType.Presentation);
            PresentationPart presentationPart = presentationDoc.AddPresentationPart();
            presentationPart.Presentation = new Presentation();

            CreatePresentationParts(presentationPart);
            
            //Close the presentation handle
            presentationDoc.Close();


        }


        private void CreatePresentationParts(PresentationPart presentationPart)
        {
            SlideMasterIdList slideMasterIdList1 = new SlideMasterIdList(new SlideMasterId() { Id = (UInt32Value)2147483648U, RelationshipId = "rId1" });
            SlideIdList slideIdList1 = new SlideIdList(new SlideId() { Id = (UInt32Value)256U, RelationshipId = "rId2" });
            SlideSize slideSize1 = new SlideSize() { Cx = 9144000, Cy = 6858000, Type = SlideSizeValues.Screen4x3 };
            NotesSize notesSize1 = new NotesSize() { Cx = 6858000, Cy = 9144000 };
            DefaultTextStyle defaultTextStyle1 = new DefaultTextStyle();

            presentationPart.Presentation.Append(slideMasterIdList1, slideIdList1, slideSize1, notesSize1, defaultTextStyle1);

            SlidePart slidePart1;
            SlideLayoutPart slideLayoutPart1;
            SlideMasterPart slideMasterPart1;
            ThemePart themePart1;


            slidePart1 = CreateSlidePart(presentationPart);
            slideLayoutPart1 = CreateSlideLayoutPart(slidePart1);
            slideMasterPart1 = CreateSlideMasterPart(slideLayoutPart1);
            themePart1 = CreateTheme(slideMasterPart1);

            slideMasterPart1.AddPart(slideLayoutPart1, "rId1");
            presentationPart.AddPart(slideMasterPart1, "rId1");
            presentationPart.AddPart(themePart1, "rId5");
        }


        private SlidePart CreateSlidePart(PresentationPart presentationPart)
        {
            SlidePart slidePart1 = presentationPart.AddNewPart<SlidePart>("rId2");
            slidePart1.Slide = new Slide(
                    new CommonSlideData(
                        new ShapeTree(
                            new P.NonVisualGroupShapeProperties(
                                new P.NonVisualDrawingProperties() { Id = (UInt32Value)1U, Name = "" },
                                new P.NonVisualGroupShapeDrawingProperties(),
                                new ApplicationNonVisualDrawingProperties()),
                            new GroupShapeProperties(new D.TransformGroup()),
                            new P.Shape(
                                new P.NonVisualShapeProperties(
                                    new P.NonVisualDrawingProperties() { Id = (UInt32Value)2U, Name = "Title 1" },
                                    new P.NonVisualShapeDrawingProperties(new D.ShapeLocks() { NoGrouping = true }),
                                    new ApplicationNonVisualDrawingProperties(new PlaceholderShape())),
                                new P.ShapeProperties(),
                                new P.TextBody(
                                    new D.BodyProperties(),
                                    new D.ListStyle(),
                                    new D.Paragraph(new D.EndParagraphRunProperties() { Language = "en-US" }))))),
                    new ColorMapOverride(new D.MasterColorMapping()));
            return slidePart1;
        }


        private SlideLayoutPart CreateSlideLayoutPart(SlidePart slidePart1)
        {
            SlideLayoutPart slideLayoutPart1 = slidePart1.AddNewPart<SlideLayoutPart>("rId1");
            SlideLayout slideLayout = new SlideLayout(
            new CommonSlideData(new ShapeTree(
              new P.NonVisualGroupShapeProperties(
              new P.NonVisualDrawingProperties() { Id = (UInt32Value)1U, Name = "" },
              new P.NonVisualGroupShapeDrawingProperties(),
              new ApplicationNonVisualDrawingProperties()),
              new GroupShapeProperties(new D.TransformGroup()),
              new P.Shape(
              new P.NonVisualShapeProperties(
                new P.NonVisualDrawingProperties() { Id = (UInt32Value)2U, Name = "" },
                new P.NonVisualShapeDrawingProperties(new D.ShapeLocks() { NoGrouping = true }),
                new ApplicationNonVisualDrawingProperties(new PlaceholderShape())),
              new P.ShapeProperties(),
              new P.TextBody(
                new D.BodyProperties(),
                new D.ListStyle(),
                new D.Paragraph(new D.EndParagraphRunProperties()))))),
            new ColorMapOverride(new D.MasterColorMapping()));
            slideLayoutPart1.SlideLayout = slideLayout;
            return slideLayoutPart1;
        }


        private SlideMasterPart CreateSlideMasterPart(SlideLayoutPart slideLayoutPart1)
        {
            SlideMasterPart slideMasterPart1 = slideLayoutPart1.AddNewPart<SlideMasterPart>("rId1");
            SlideMaster slideMaster = new SlideMaster(
            new CommonSlideData(new ShapeTree(
              new P.NonVisualGroupShapeProperties(
              new P.NonVisualDrawingProperties() { Id = (UInt32Value)1U, Name = "" },
              new P.NonVisualGroupShapeDrawingProperties(),
              new ApplicationNonVisualDrawingProperties()),
              new GroupShapeProperties(new D.TransformGroup()),
              new P.Shape(
              new P.NonVisualShapeProperties(
                new P.NonVisualDrawingProperties() { Id = (UInt32Value)2U, Name = "Title Placeholder 1" },
                new P.NonVisualShapeDrawingProperties(new D.ShapeLocks() { NoGrouping = true }),
                new ApplicationNonVisualDrawingProperties(new PlaceholderShape() { Type = PlaceholderValues.Title })),
              new P.ShapeProperties(),
              new P.TextBody(
                new D.BodyProperties(),
                new D.ListStyle(),
                new D.Paragraph())))),
            new P.ColorMap() { Background1 = D.ColorSchemeIndexValues.Light1, Text1 = D.ColorSchemeIndexValues.Dark1, Background2 = D.ColorSchemeIndexValues.Light2, Text2 = D.ColorSchemeIndexValues.Dark2, Accent1 = D.ColorSchemeIndexValues.Accent1, Accent2 = D.ColorSchemeIndexValues.Accent2, Accent3 = D.ColorSchemeIndexValues.Accent3, Accent4 = D.ColorSchemeIndexValues.Accent4, Accent5 = D.ColorSchemeIndexValues.Accent5, Accent6 = D.ColorSchemeIndexValues.Accent6, Hyperlink = D.ColorSchemeIndexValues.Hyperlink, FollowedHyperlink = D.ColorSchemeIndexValues.FollowedHyperlink },
            new SlideLayoutIdList(new SlideLayoutId() { Id = (UInt32Value)2147483649U, RelationshipId = "rId1" }),
            new TextStyles(new TitleStyle(), new BodyStyle(), new OtherStyle()));
            slideMasterPart1.SlideMaster = slideMaster;

            return slideMasterPart1;
        }


        private ThemePart CreateTheme(SlideMasterPart slideMasterPart1)
        {
            ThemePart themePart1 = slideMasterPart1.AddNewPart<ThemePart>("rId5");
            D.Theme theme1 = new D.Theme() { Name = "Office Theme" };

            D.ThemeElements themeElements1 = new D.ThemeElements(
            new D.ColorScheme(
              new D.Dark1Color(new D.SystemColor() { Val = D.SystemColorValues.WindowText, LastColor = "000000" }),
              new D.Light1Color(new D.SystemColor() { Val = D.SystemColorValues.Window, LastColor = "FFFFFF" }),
              new D.Dark2Color(new D.RgbColorModelHex() { Val = "1F497D" }),
              new D.Light2Color(new D.RgbColorModelHex() { Val = "EEECE1" }),
              new D.Accent1Color(new D.RgbColorModelHex() { Val = "4F81BD" }),
              new D.Accent2Color(new D.RgbColorModelHex() { Val = "C0504D" }),
              new D.Accent3Color(new D.RgbColorModelHex() { Val = "9BBB59" }),
              new D.Accent4Color(new D.RgbColorModelHex() { Val = "8064A2" }),
              new D.Accent5Color(new D.RgbColorModelHex() { Val = "4BACC6" }),
              new D.Accent6Color(new D.RgbColorModelHex() { Val = "F79646" }),
              new D.Hyperlink(new D.RgbColorModelHex() { Val = "0000FF" }),
              new D.FollowedHyperlinkColor(new D.RgbColorModelHex() { Val = "800080" })) { Name = "Office" },
              new D.FontScheme(
              new D.MajorFont(
              new D.LatinFont() { Typeface = "Calibri" },
              new D.EastAsianFont() { Typeface = "" },
              new D.ComplexScriptFont() { Typeface = "" }),
              new D.MinorFont(
              new D.LatinFont() { Typeface = "Calibri" },
              new D.EastAsianFont() { Typeface = "" },
              new D.ComplexScriptFont() { Typeface = "" })) { Name = "Office" },
              new D.FormatScheme(
              new D.FillStyleList(
              new D.SolidFill(new D.SchemeColor() { Val = D.SchemeColorValues.PhColor }),
              new D.GradientFill(
                new D.GradientStopList(
                new D.GradientStop(new D.SchemeColor(new D.Tint() { Val = 50000 },
                  new D.SaturationModulation() { Val = 300000 }) { Val = D.SchemeColorValues.PhColor }) { Position = 0 },
                new D.GradientStop(new D.SchemeColor(new D.Tint() { Val = 37000 },
                 new D.SaturationModulation() { Val = 300000 }) { Val = D.SchemeColorValues.PhColor }) { Position = 35000 },
                new D.GradientStop(new D.SchemeColor(new D.Tint() { Val = 15000 },
                 new D.SaturationModulation() { Val = 350000 }) { Val = D.SchemeColorValues.PhColor }) { Position = 100000 }
                ),
                new D.LinearGradientFill() { Angle = 16200000, Scaled = true }),
              new D.NoFill(),
              new D.PatternFill(),
              new D.GroupFill()),
              new D.LineStyleList(
              new D.Outline(
                new D.SolidFill(
                new D.SchemeColor(
                  new D.Shade() { Val = 95000 },
                  new D.SaturationModulation() { Val = 105000 }) { Val = D.SchemeColorValues.PhColor }),
                new D.PresetDash() { Val = D.PresetLineDashValues.Solid })
              {
                  Width = 9525,
                  CapType = D.LineCapValues.Flat,
                  CompoundLineType = D.CompoundLineValues.Single,
                  Alignment = D.PenAlignmentValues.Center
              },
              new D.Outline(
                new D.SolidFill(
                new D.SchemeColor(
                  new D.Shade() { Val = 95000 },
                  new D.SaturationModulation() { Val = 105000 }) { Val = D.SchemeColorValues.PhColor }),
                new D.PresetDash() { Val = D.PresetLineDashValues.Solid })
              {
                  Width = 9525,
                  CapType = D.LineCapValues.Flat,
                  CompoundLineType = D.CompoundLineValues.Single,
                  Alignment = D.PenAlignmentValues.Center
              }),
              new D.EffectStyleList(
              new D.EffectStyle(
                new D.EffectList(
                new D.OuterShadow(
                  new D.RgbColorModelHex(
                  new D.Alpha() { Val = 38000 }) { Val = "000000" }) { BlurRadius = 40000L, Distance = 20000L, Direction = 5400000, RotateWithShape = false })),
              new D.EffectStyle(
                new D.EffectList(
                new D.OuterShadow(
                  new D.RgbColorModelHex(
                  new D.Alpha() { Val = 38000 }) { Val = "000000" }) { BlurRadius = 40000L, Distance = 20000L, Direction = 5400000, RotateWithShape = false }))),
              new D.BackgroundFillStyleList(
              new D.SolidFill(new D.SchemeColor() { Val = D.SchemeColorValues.PhColor }),
              new D.GradientFill(
                new D.GradientStopList(
                new D.GradientStop(
                  new D.SchemeColor(new D.Tint() { Val = 50000 },
                    new D.SaturationModulation() { Val = 300000 }) { Val = D.SchemeColorValues.PhColor }) { Position = 0 },
                new D.GradientStop(
                  new D.SchemeColor(new D.Tint() { Val = 50000 },
                    new D.SaturationModulation() { Val = 300000 }) { Val = D.SchemeColorValues.PhColor }) { Position = 0 },
                new D.GradientStop(
                  new D.SchemeColor(new D.Tint() { Val = 50000 },
                    new D.SaturationModulation() { Val = 300000 }) { Val = D.SchemeColorValues.PhColor }) { Position = 0 }),
                new D.LinearGradientFill() { Angle = 16200000, Scaled = true }),
              new D.GradientFill(
                new D.GradientStopList(
                new D.GradientStop(
                  new D.SchemeColor(new D.Tint() { Val = 50000 },
                    new D.SaturationModulation() { Val = 300000 }) { Val = D.SchemeColorValues.PhColor }) { Position = 0 },
                new D.GradientStop(
                  new D.SchemeColor(new D.Tint() { Val = 50000 },
                    new D.SaturationModulation() { Val = 300000 }) { Val = D.SchemeColorValues.PhColor }) { Position = 0 }),
                new D.LinearGradientFill() { Angle = 16200000, Scaled = true }))) { Name = "Office" });

            theme1.Append(themeElements1);
            theme1.Append(new D.ObjectDefaults());
            theme1.Append(new D.ExtraColorSchemeList());

            themePart1.Theme = theme1;
            return themePart1;

        }

    }


    [DataContract]
    public class Configuration
    {
        [DataMember]
        [DisplayName("Value")]
        public string Value { get; set; }

        [DataMember]
        [DisplayName("Name")]
        public decimal Name{ get; set; }


    }

Now we will look at the client side :

You can now add the service reference (as you do normally) and write below code.

        ServiceClient proxy = new ServiceClient();
        Stream stream;
        SaveFileDialog objSFD;
        private void btnPowerpoint_Click(object sender, RoutedEventArgs e)
        {
             objSFD = new SaveFileDialog()
            {
                // DefaultExt = "csv",
                Filter = "Powerpoint Presentation (*.pptx)|*.pptx | All files (*.*)|*.*",
                FilterIndex = 1,

            };

            if ( objSFD.ShowDialog()==true)
            {
		// Here Configuration is a class in the Service. Please look at service for more information
		//about this class 
                List<ServiceReference.Configuration> obj = new List<ServiceReference.Configuration>();
                
		//Data can be anything which needs to go into ppt as table
                foreach (var config in Data)
                {
                    obj.Add(new ServiceReference.Configuration()
                    {
                        
                        Value = Data.Value,
                        Name = Data.Name,
                       
                    });
                }


                proxy.CreateTableInLastSlideAsync(new System.Collections.ObjectModel.ObservableCollection<Configuration>(obj));
                proxy.CreateTableInLastSlideCompleted += new EventHandler<CreateTableInLastSlideCompletedEventArgs>(proxy_CreateTableInLastSlideCompleted); 
            }
            
               
        }

        void proxy_CreateTableInLastSlideCompleted(object sender, CreateTableInLastSlideCompletedEventArgs e)
        {
            if (e.Result == null)
                return;
            
           
            using (System.IO.Stream stream = objSFD.OpenFile())
            {
                stream.Write(e.Result, 0, e.Result.Length);
               
            }
        }


You will be able to see the output as below :

Powerpoint with OpenXML image

Powerpoint with OpenXML

Set property ‘System.Windows.ResourceDictionary.DeferrableContent’ threw an exception

This is a most common WPF exception when you are working with Resource Dictionary. Following are the causes :

1. In your Resource Dictionary you would have 2 resource with the same Key defined.

2.The above condition may be also valid if you are using Merged Resource Dictionary 

3. You might have had a Duplicate resource defined and removed , but still able to see (this is due to improper build of your solution – Try Rebuilding it !!! )

Solutions :

1. Try to find where you have duplicate resource defined with the same key

2. If the above thing doesnt work and you are pretty sure you dont have any duplicate resources , try rebuilding the solution and Close and Open Visual studio.